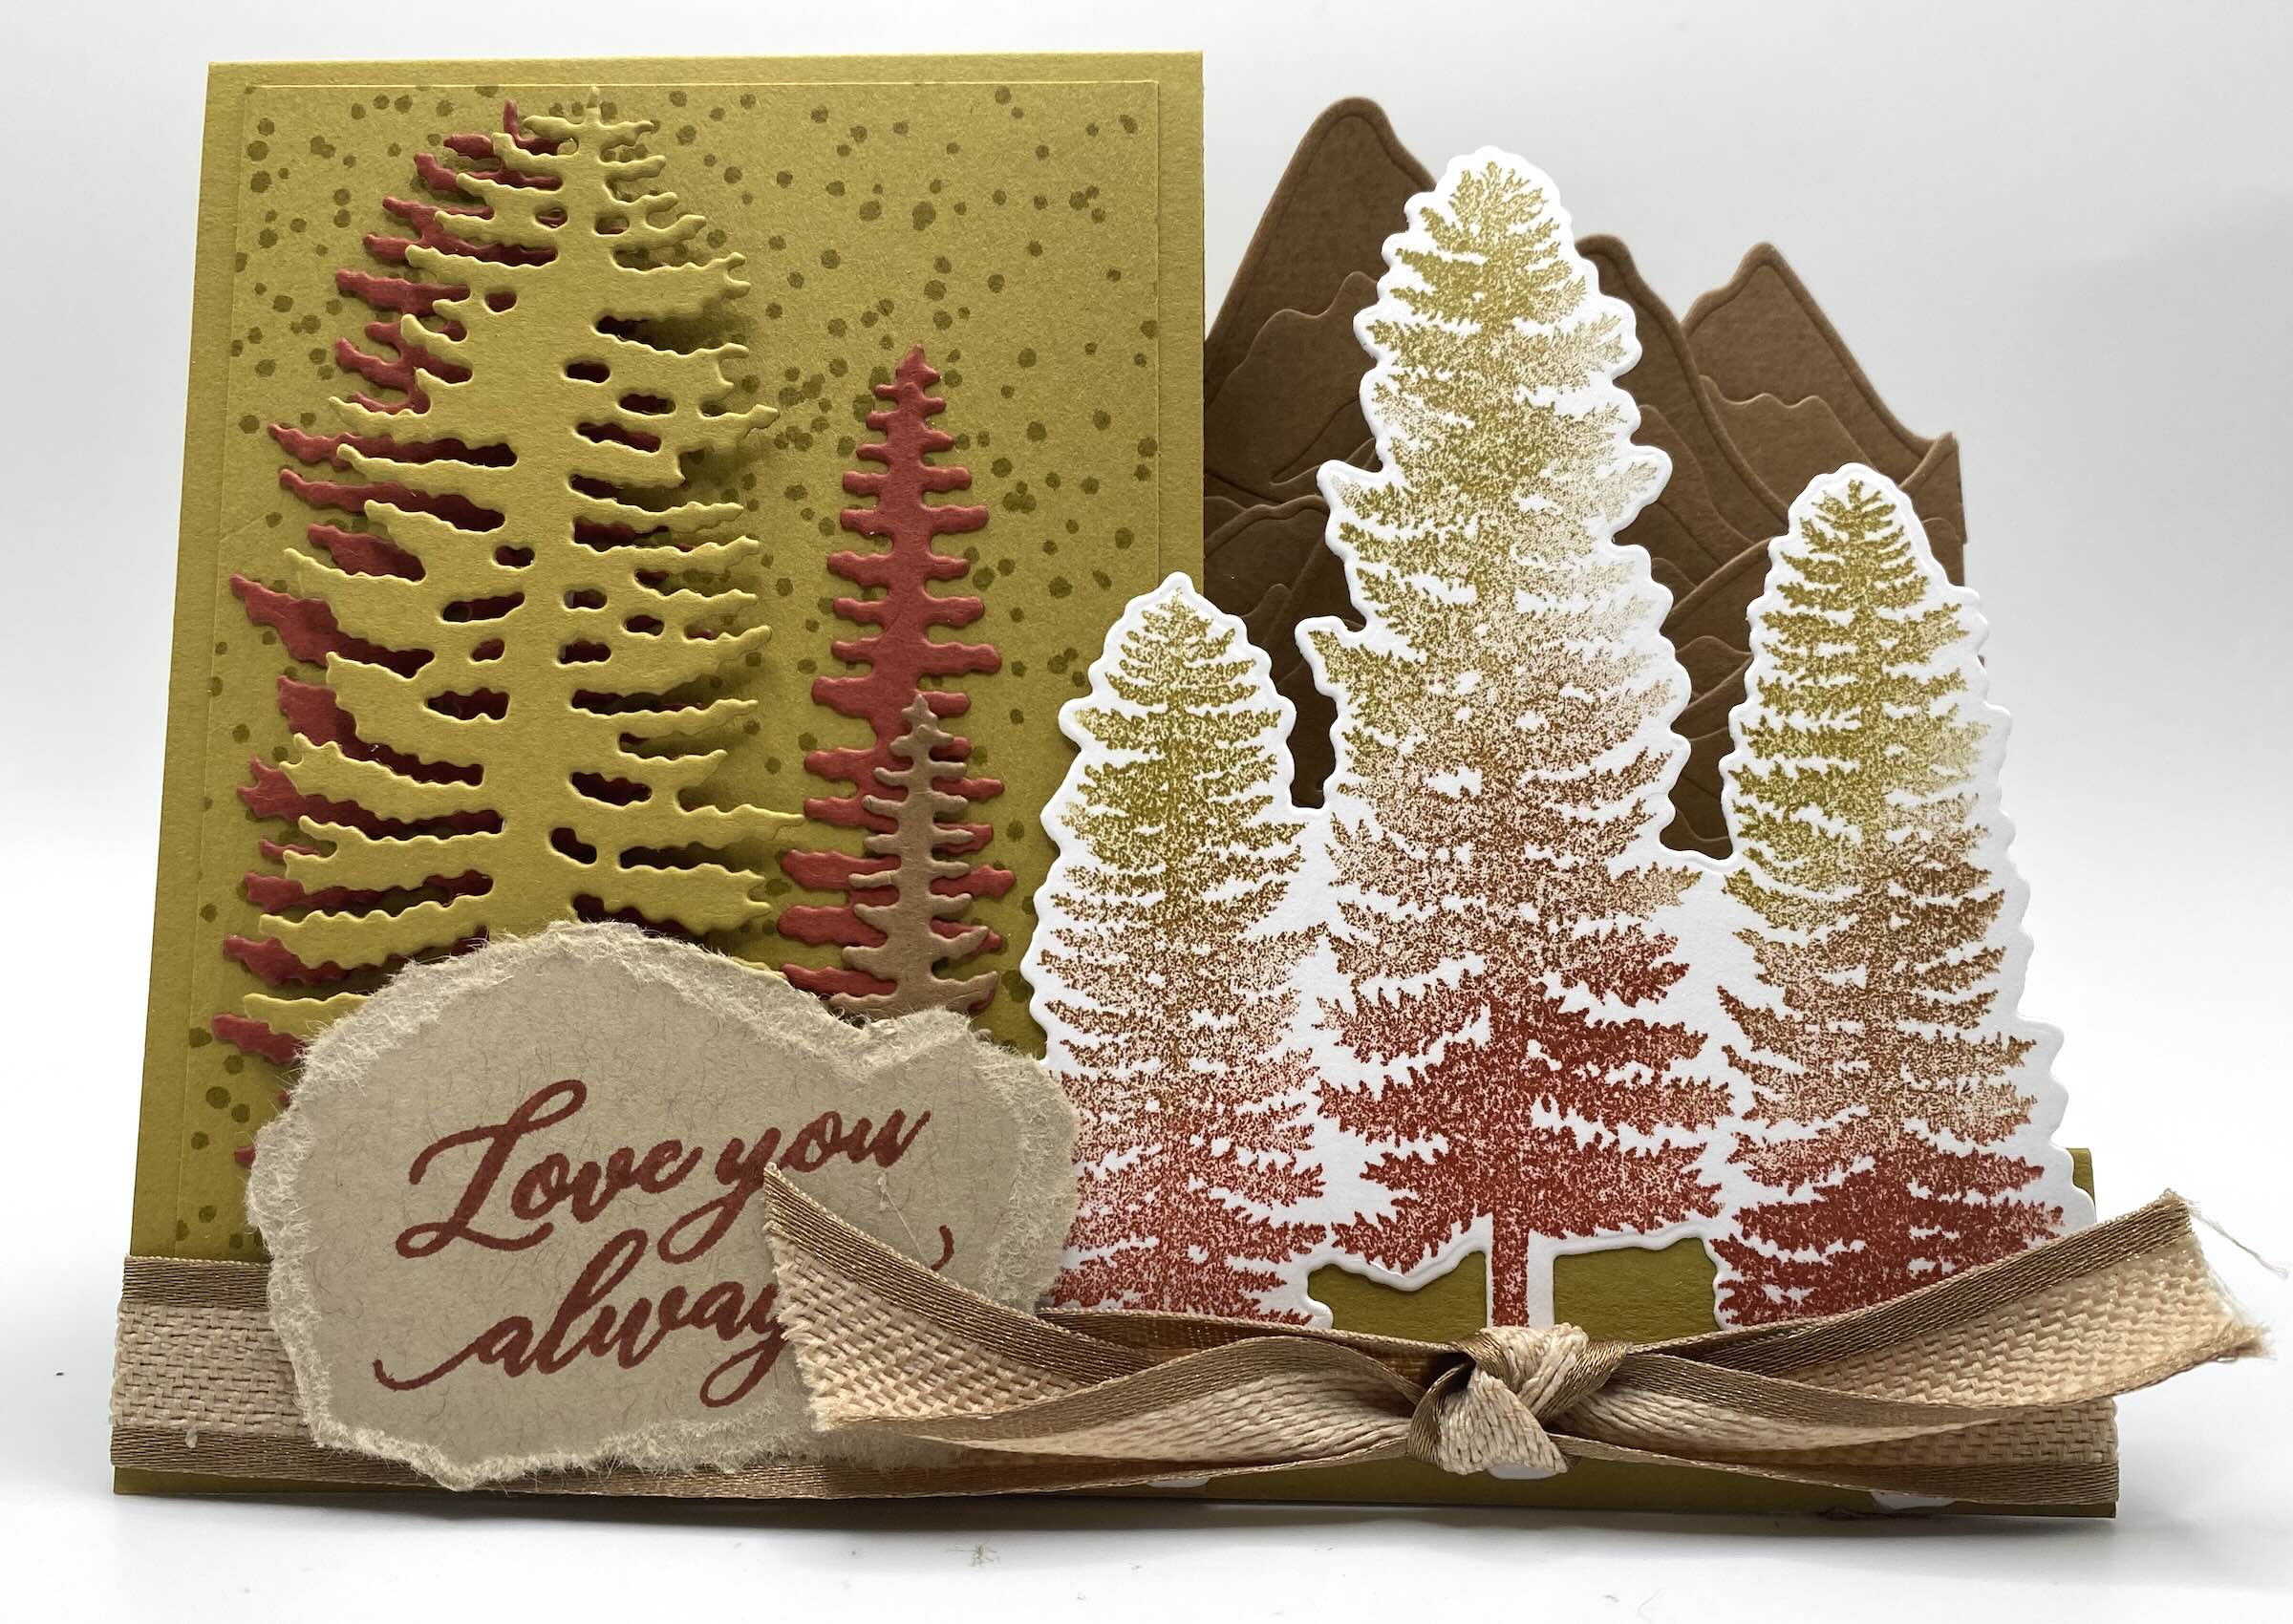
I’m loving this step fold, because it’s a simple base to start out with…and then from there you can make it is elaborate or as sweet and simple as you wish. It’s all up to you…the artist! For this card, I used the Forever Forest stamps and its coordinating dies. I feel like these stamps definitely do not get enough spotlight time. Who doesn’t love a beautiful tree???


Aren’t the trees just gorgeous? I never get tired of seeing trees…I know that might sound odd, but I’ve always loved them. One of my favorite wanderings were during our trip up the west coast of California. The more north we got, the bigger the trees. We spent time at Sequoia, Redwoods, Kings Canyon and Yosemite National Park while up there and those trees….well there really are no words but incredible and amazing! Standing among those giants was one of my favorite moments so far in our travels. These trees remind me a bit of my time up there.
This card was created with a masculine feel, using a base of Wild Wheat cardstock. I paired it up with Cajun Craze, Pecan Pie and Crumb Cake cardstock and ink so it has an earthy feel. Here’s how to make this card:
CUTTING/SCORING INSTRUCTIONS:
BASE (Wild Wheat): 8″x5 1/2″, scored at 1″, 2″ and 5″
FRONT PIECE (Wild Wheat): 3″x6″, scored at 1 3/4″; (Wild Wheat) 2 3/4″x4″ for front
BACK LAYER (Crumb Cake): 2 7/8″x5 3/8″
ASSEMBLY:
Cut and score your base and front pieces. (The base is folded as a mountain fold at the 1″ score line, then valley fold, then mountain fold. Front piece is a mountain fold.) Crease with your bone folder. Set aside.
Decorate the 2 3/4″x4″ piece. I stamped the snow in Wild Wheat for a tone on tone look. You can also stamp in Versamark ink to get a more subtle snow look. Adhere to your front piece. Adhere the front piece to the base, matching up the bottom left corners on the front so they are flush. Then with the base fold flat, adhere the top part to the back of the card.
Stamp your sentiments and decorate the back layer and adhere that to the back of your card.
Now you can focus on the card front. to create this card, I die cut several different size trees and 3 sets of mountains using coordinating cardstock. I layered the mountains on the cards and trimmed them to create a mountain range scene. Use dimensionals to give them some extra lift. I also built the tree forest on the front panel in the same manner, layering them and using some dimensionals for extra flair.
To create the stamped trees, I used my blending brushes to dab ink onto my stamp, I used Cajun Craze on the bottom, then blended that into Pecan Pie and then blended that into Wild Wheat. (**Tip: stamp your clear blocks directly onto your stamp pads for this technique. Your blending brushes will soak up less ink and you won’t dry out your ink pad by soaking all that ink needlessly Into your brushes.). Once you have your stamp inked up well, give it a good huff to remoisten the ink and stamp down onto Basic White cardstock. Then, use the coordinating die to cut it out. Adhere it to the bottom 1″ portion of the card base using liquid glue just on the bottom portion of the trees.
To finish this card off, add a ribbon and a sentiment to the front. I stamped my sentiment on Crumb Cake cardstock and hand tore it (towards me) to create a rustic worn look.
There you go, a rustic card great for any gender and pretty unique! This would also be pretty for fall as well,
Here are a few other samples I created. See, I told you it’s versatile!!


This card was created using the Zany Zoo stamps and coordinating dies. I paired it with the In Color 6×6 DSP to match, A little Clear Wink of Stella gave Mr. Gator and Mr. Racoon a sparkle. So fun!


This adorable card shows off the By My Side friends. I love this set because it reminds me of my grandchildren and always makes me smile and think of them when I use it. The Sending Sunshine sentiment came from the Good Feelings stamp set. I created the card base in Daffodil Delight. The Basic Borders dies have a great little cloud die that pairs perfectly with the Rays of Light background stamp. I stamped the rays in Versamark and then color them in with Clear Wink of Stella so they sparkle & shine! The tag was created with the Happy Labels Pick a Punch and I added some black string to set it off. Now all I have to do is decide who will get this happy little card!

Lastly, here’s the inspiration for my video. This is my holiday card. My sweet mother-in-law purchased the Night Divine Bundle and I purchased an extra pack of O Holy Night DSP so we could create cards together – and I fell in love with this card. I die cut the silhouette for the front and a camel for the back. It came out so pretty!
So there you go, lots of ideas for this very versatile and easy to create Step Fold Card. I hope you enjoy making it and letting your creative imagination take over decorating this fun fold card.
Don’t forget to stop over at my online store to take a look at all the fantastic tools available to create your own artistic masterpieces. And please check out my other videos for more inspiration.
Happy Crafting!

