
Fall is here and it’s finally cooling off. That means it is time to get those Fall decorations out and decorate the RV. I love Fall…it’s my favorite season. To get the season started right, I decided to get in the mood by creating this super cool Bay Window Fold using the whimsical Pick of the Patch Bundle. I really wanted to play around with colors so I pulled out the watercolor paper and some warm colors (Pretty Peacock, Cajun Craze and Pumpkin Pie), popped in my Air Pods to listen to my “creative playlist” and got started….so much fun! I hope you enjoy this fold as much as I do. And watercoloring, in my humble opinion, really lets you channel your creative energies…just let that ink go where it may and create something beautiful.

There are so many amazing products to use when creating your cards. One technique sometimes overlooked is using watercolor paper and your inks to create unique backgrounds…patterns, sunsets, sunrises, hombre tones…every piece completely unique. That’s art!! All you need is Stampin’ Up’s Fluid 100 Watercolor Paper, Water Painters, and a Stampin’ Spritzer. These tools will set you up for success!!

Here’s how I made this fun fold.
INSTRUCTIONS:
Cutting & Scoring
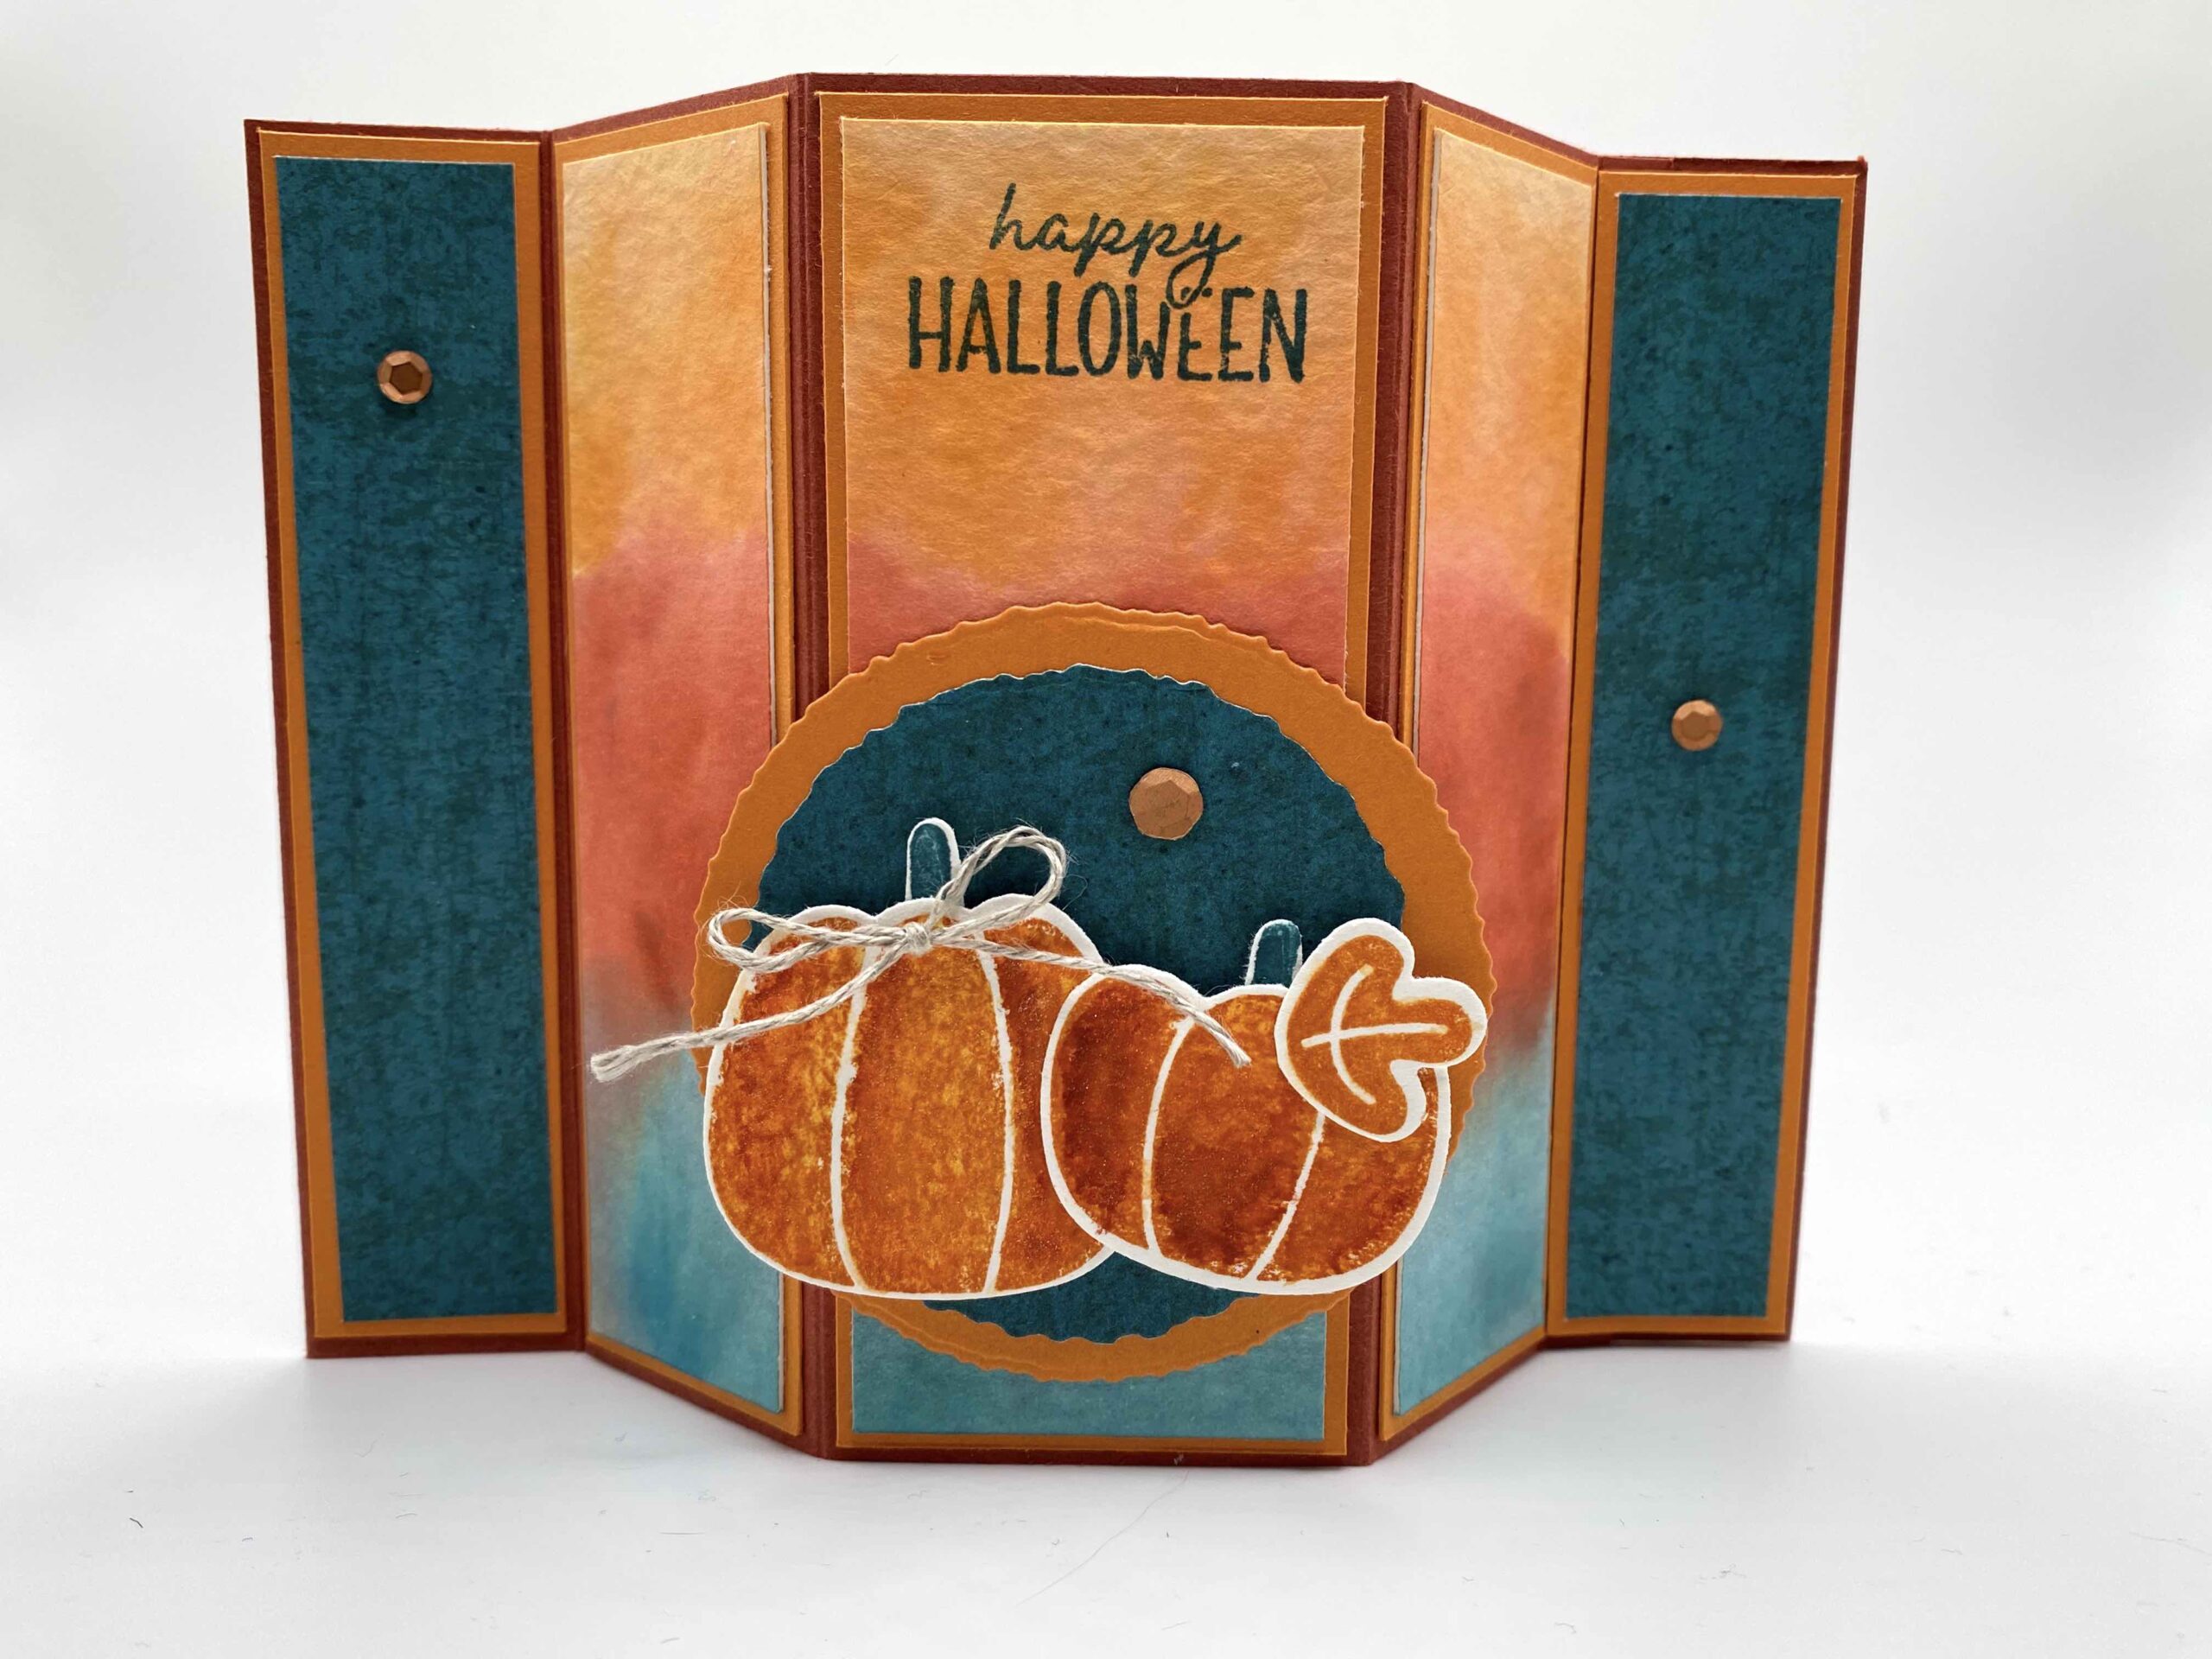
BASE (Cajun Craze): cut 4 1/4″x11″; score at 1/4″, 1 1/2″, 3 1/4″, 4 1/2″ and 5 1/2″
LAYER FOR BASE : Pumpkin Pie 7/8″x4 1/8″ (x2); 1 1/8″x4 1/8″ (x2); 1 5/8″x4 1/8″ (x1)
Choose DSP to match such as Pretty Peacock DSP from Earthen Elements DSP pack): cut3/4″x4″ (x2)
Watercolor Paper cut to 3 1/2″ x 4″ …after painting/drying, cut 3 consecutive panels – 1″, 1 1/2″, 1″
INSIDE LAYERS: Pumpkin Pie 3 3/8″x4 1/8″; Basic White 3 1/4″x4″
WATERCOLOR & ASSEMBLY: Gather up your supplies…3 ink pads such as Pretty Peacock, Cajun Craze and Pumpkin Pie, an Aqua Paint, a Spritzer, and a paper towel for cleaning your aqua painter. Arrange the watercolor paper to portrait so it’s taller than it is wide. Spritz your bottom 3rd of the paper with water. Choose your Pretty Peacock ink, give the closed stamp case a squeeze to create a pool of ink, open the pad and use your aqua painter to apply the ink to the watered area. Once you’re happy with the color, clean your painter and move on to the next 3rd with your spritzer and the Cajun Craze and then the Pumpkin Pie. Set your paper aside to dry.
Take your Cajun Craze base piece and fold it in half in a valley fold, which is the 5 1/2″ score line. Crease well with your bone folder. Then fold the next 3 score lines as a mountain fold to create the bay window. Finally, crease the 1/4″ score line, which will be your tab that tucks in to hold the window “open”. After you’ve scored everything, use liquid glue to glue down the first section you folded (between the 4 1/2″ and 5 1/2″ score lines).
If needed, use your heat tool to finish drying your watercolor paper. Then cut it into the 3 consecutive sizes as listed above. Next, grab your Pumpkin Pie pieces for the Base. Adhere the 2 Pretty Peacock DSP pieces to the 7/8″ pieces; then, adhere the watercolor paper pieces to the two 1 1/8″ pieces and the 1 5/8″ piece. Adhere from left to right all the pieces to the card BASE. The far right Pretty Peacock piece will be adhered differently than the other pieces. On this last piece, you want to lay it where you want it to be and place the little flap under the edge so you know where it will lie when the card is set up. Hold down the base and use a pencil to draw a line where you need to add your dimensionals. (refer to the video for this part…it will make sense!). Once all your dimensionals are in place, you can add that last piece on top.
For the inside, stamp your images and sentiments on the Basic White and adhere the layers to the inside.
To create the piece for the front of the card, die cut 2 stacking shapes such as the Deckled Circles. I used Pumpkin Pie and Pretty Peacock DSP. Glue the two layers together. Stamp your pumpkins, leaves and stems on water color paper and use your aqua painter to pull the ink around to create a water color look. Use the punch to cut them out (or fussy cut them if you don’t have the punch). Layer those pieces on the front of your circles (or whatever tag shapes you choose). Adhere your front piece to the front bay window. Embellish with twine, gems, etc. Now sit back and gaze with awe at your masterpiece. Isn’t she lovely!
This Bay Window fold also works perfectly with any DSP that has a scene on it, such as the One Horse Open Sleigh DSP. I used that pack to create some amazing Christmas cards! Check out this one using the Winter Owls and One Horse Open Sleigh together!

I hope you enjoyed making this card. I’m sure it will be one you’ll go back to again and again.
Don’t forget to subscribe to my YouTube Channel and check out my online store for all your card making supplies. I’m here to help you create your own masterpieces.
Thank you!!!